Auto Scaling

The demands on any application vary over time. Whether its the daily changes in traffic volume on an online shopping platform or massive load from processing large sets of data, applications and their underlying infrastructure must be able to cope with changes in demand. It is important to both avoid downtime when demand increases as well as to avoid high costs of running many machines when demand decreases.

It is not always easy or possible to predict what kind of resources will be necessary when creating a Kubernetes cluster. The decision one must make is whether to choose fewer nodes and risk downtime when the website is busy or choose more nodes and risk paying for unused resources.

To assist with these scenarios, Catalyst Cloud Kubernetes Service provides a feature called cluster auto-scaling. Cluster auto-scaling enables a Kubernetes cluster to automatically increase or decrease the number of working nodes in response to changes in resource demand. In this section we will explore how you can use auto-scaling in your Kubernetes cluster.

Enabling auto scaling

To enable cluster auto-scaling the labels below must be defined at cluster creation time:

  • auto_scaling_enabled=true

  • min_node_count=${minimum}

  • max_node_count=${maximum}

Note

Cluster auto-scaling only scales worker nodes. Control plane nodes are not subject to auto-scaling.

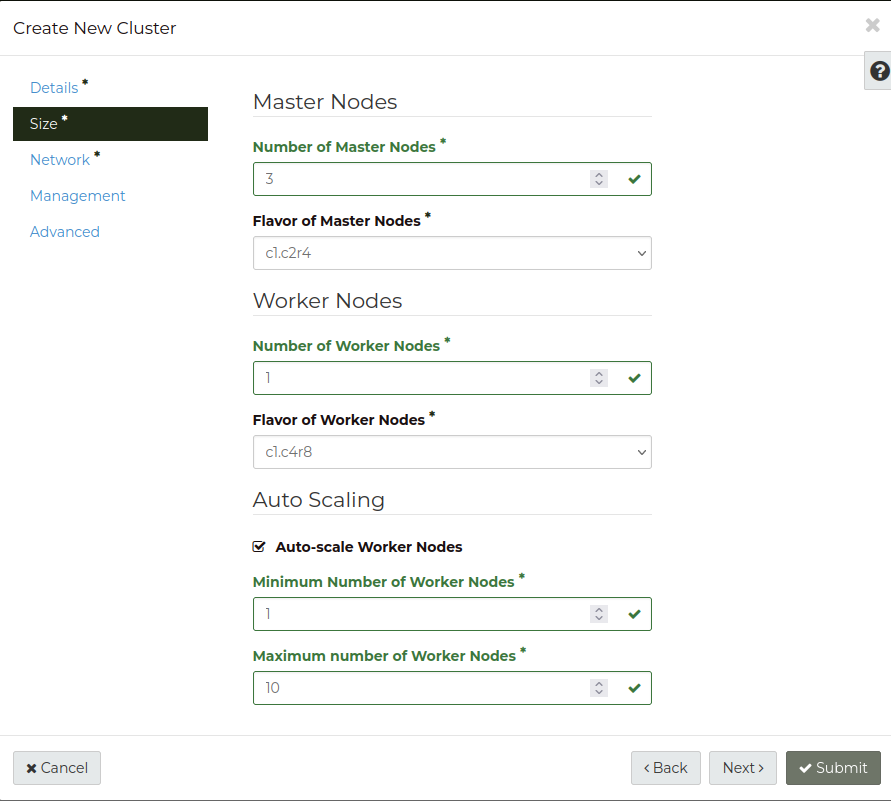
Create cluster with auto-scaling in the command line.

openstack coe cluster create my-cluster \
--cluster-template kubernetes-v1.28.9-20240416 \
--master-count=3 \
--node-count=1 \
--merge-labels \
--labels auto_scaling_enabled=true,min_node_count=1,max_node_count=10

Note

Auto-scaling does not use the current CPU and memory usage as metrics to resize the cluster, but rather the CPU and memory reservation (resource requests) in the pod specification to determine if the capacity allocated to a worker node.

The value for min_node_count must be greater than zero. The value for max_node_count must be greater than the value for min_node_count. The value for min_node_count overrides the –node-count argument if it is lower.

Note

When auto-scaling is enabled, the value displayed for node count in the dashboard and command line will not reflect the actual number of worker nodes if the auto-scaler has made changes.

This is a bug and we are working to address this soon.

The auto-scaling feature requires the use of resource requests for CPU and memory in the pod specification. The following pod specification illustrates the use of resource requests:

apiVersion: v1
kind: Pod
metadata:
  name: webserver
spec:
  containers:
  - name: webserver-ctr
    image: nginx
    resources:
      requests:
        memory: "128Mi"
        cpu: "0.5"

The conditions that trigger a cluster resize are explained below:

  • Scale out: a worker node is added to the cluster when the Kubernetes scheduler is unable to allocate a pod to any existing worker node due to insufficient capacity.

  • Scale in: a worker node is removed from the cluster when the cluster resource usage drops below the defined threshold (by default 50%) for a period of time.

Auto scaling in action

The following example assumes:

  • You have created a Catalyst Cloud Kubernetes cluster as demonstrated earlier.

  • You are authenticated as a user with one of the Kubernetes RBAC roles which allow you to create resources on a cluster.

First, create a file called stressdeploy.yaml with the following content.

---
apiVersion: apps/v1
kind: Deployment
metadata:
  creationTimestamp: null
  labels:
    app: scalestress
  name: scalestress
spec:
  replicas: 1
  selector:
    matchLabels:
      app: scalestress
  strategy: {}
  template:
    metadata:
      creationTimestamp: null
      labels:
        app: scalestress
    spec:
      containers:
      - image: polinux/stress
        name: stress
        command:
          - stress
          - --cpu
          - "1"
          - --io
          - "1"
          - --vm
          - "1"
          - --vm-bytes
          - 128M
          - --verbose
        resources:
          limits:
            memory: 256Mi
          requests:
            cpu: "1"
            memory: 128Mi

Now apply this deployment to your cluster.

kubectl apply -f stressdeploy.yaml

deployment.apps/scalestress created

You should now have a single Pod running from the scalestress deployment.

kubectl get pods
NAME                           READY   STATUS    RESTARTS   AGE
scalestress-8489678776-wfqhx   1/1     Running   0          46m

Scaling up nodes

Next, let’s scale this pod up a bit. Let’s increase scalestress to ten replicas to see what happens:

kubectl scale deploy scalestress --replicas=10
deployment.apps/scalestress scaled

Now we just sit back and watch the cluster nodes.

kubectl get node -w

NAME                                                    STATUS   ROLES           AGE    VERSION
my-cluster-qr5alwznm4m3-control-plane-6dcf69ec-zk8bg    Ready    control-plane   172m   v1.28.8
my-cluster-qr5alwznm4m3-control-plane-hefe69ec-zk8bg    Ready    control-plane   172m   v1.28.8
my-cluster-qr5alwznm4m3-control-plane-d38d69ec-zk8bg    Ready    control-plane   172m   v1.28.8
my-cluster-qr5alwznm4m3-default-worker-88bc9045-7kgxj   Ready    <none>          172m   v1.28.8

After a few minutes you should start to see nodes added to the cluster.

kubectl get node

NAME                                                    STATUS   ROLES           AGE    VERSION
my-cluster-qr5alwznm4m3-control-plane-6dcf69ec-zk8bg    Ready    control-plane   3h9m    v1.28.8
my-cluster-qr5alwznm4m3-control-plane-hefe69ec-zk8bg    Ready    control-plane   3h9m    v1.28.8
my-cluster-qr5alwznm4m3-control-plane-d38d69ec-zk8bg    Ready    control-plane   3h9m    v1.28.8
my-cluster-qr5alwznm4m3-default-worker-88bc9045-6ms4n   Ready    <none>          6m49s   v1.28.8
my-cluster-qr5alwznm4m3-default-worker-88bc9045-7kgxj   Ready    <none>          3h6m    v1.28.8
my-cluster-qr5alwznm4m3-default-worker-88bc9045-m74cx   Ready    <none>          6m48s   v1.28.8
my-cluster-qr5alwznm4m3-default-worker-88bc9045-m9t7h   Ready    <none>          6m49s   v1.28.8
my-cluster-qr5alwznm4m3-default-worker-88bc9045-n8bl8   Ready    <none>          7m7s    v1.28.8
my-cluster-qr5alwznm4m3-default-worker-88bc9045-s7fw5   Ready    <none>          7m3s    v1.28.8

Scaling down nodes

As you might expect, auto-scaling also works in the other direction too. Specifically it should scale the number of nodes back down again when they are no longer needed.

Continuing with the previous example, let’s scale the number of Pods back down to one and see what happens.

kubectl scale deploy scalestress --replicas=1
deployment.apps/scalestress scaled

After about ten to fifteen minutes you should start to see nodes being removed from the cluster.

kubectl get node

NAME                                                    STATUS   ROLES           AGE    VERSION
my-cluster-qr5alwznm4m3-control-plane-6dcf69ec-zk8bg    Ready    control-plane   6h11m    v1.28.8
my-cluster-qr5alwznm4m3-control-plane-hefe69ec-zk8bg    Ready    control-plane   6h11m    v1.28.8
my-cluster-qr5alwznm4m3-control-plane-d38d69ec-zk8bg    Ready    control-plane   6h11m    v1.28.8
my-cluster-qr5alwznm4m3-default-worker-88bc9045-6ms4n   Ready    <none>          30m49s   v1.28.8

Summary

Auto-scaling is a versatile feature for managing demand on cluster resources. It enables your Kubernetes cluster to scale up or down when needed in response to changes in workload. It ensures that your application can cope with increased load and more importantly that you only use the resources you need.