Clusters

This section shows an in-depth view of creating clusters and their uses.

It goes over the process of creating clusters, similar to the quickstart section but also discusses private clusters and production ready clusters.

What is a cluster?

A cluster is the foundation of the Kubernetes Engine, it consists of one or more control plane nodes (also referred to as master nodes) and zero or more worker nodes. It is made up of a collection of compute, networking, and storage resources necessary to run any given workload. Communication between them is achieved by way of a shared network.

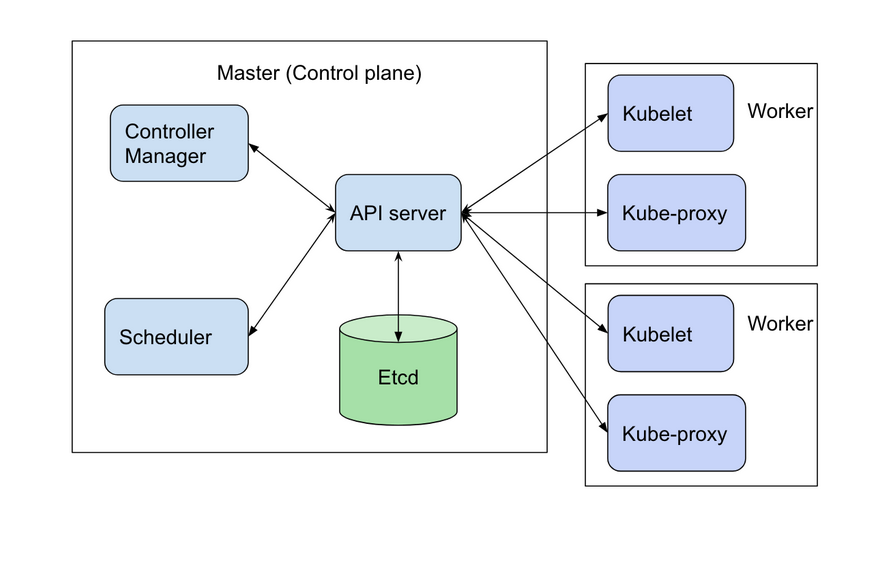
Control plane nodes consist of a collection of services responsible for providing the centralised scheduling, logic and management of the cluster.

The following diagram shows the relation between control plane and worker nodes:

Control plane and worker nodes

(image sourced from rancher.com)

Some of the key services running on the control plane are:

  • The interface to the cluster via the API server, which provides a RESTful API frontend to the control plane.

  • Configuration and state of the cluster is managed by a distributed key value store, etcd. It provides the single source of truth for the cluster and as such is the only stateful component of the control plane.

  • The scheduler watches for pod creation events and binds them to a worker node. The kubelet on that node is then responsible for starting the pod containers.

  • The Controller Manager maintains the state of pods in the cluster; creating and terminating them as required by daemonsets, deployments, replicasets and other resources.

To allow for maximum redundancy, Kubernetes clusters should be deployed with an odd number of control plane nodes e.g. 1, 3 or 5 nodes.

Note

While it is possible to run a cluster with a single control plane node, for clusters intended to run production workloads, it is highly recommended to deploy your clusters in a 3 node multi-master highly available configuration.

All nodes run kubelet and the container runtime, containerd. They are responsible for running the pod workloads assigned by the scheduler using the defined local and external resources.

Cluster Templates

The Cluster Template is a collection of parameters to describe how a cluster can be constructed. These describe the machine images to start, the Kubernetes versions, networking environment and addon installation options.

Catalyst Cloud provide public templates for our supported managed kubernetes customers and these should provide the flexibility you need.

Template Types

The naming convention used for the templates is broken down as follows:

  • kubernetes-v1.28.9: The version of Kubernetes that the template will use to create the cluster.

  • -20240416: The date on which the template was created.

To customise your cluster, you can specify template labels when creating a new cluster (see Customising clusters using labels).

Viewing Cluster Templates

Run the openstack coe cluster template list command to get a list of all currently available Cluster Templates.

$ openstack coe cluster template list
+--------------------------------------+-----------------------------------+---------------------------------------------------------------------------------+
| uuid                                 | name                              | tags                                                                            |
+--------------------------------------+-----------------------------------+---------------------------------------------------------------------------------+
| 456a5390-67c3-4a89-b1e8-ba8dbf529506 | kubernetes-v1.26.14-prod-20240218 | environment:prod,build_id:20240218,pipeline_id:40826,created_at:20240218T183133 |
| b922a741-099a-4987-bc32-d5f3e3a4beed | kubernetes-v1.27.11-prod-20240218 | environment:prod,build_id:20240218,pipeline_id:40827,created_at:20240218T183254 |
| dafe4576-8de0-4024-a12a-1bc5197b474f | kubernetes-v1.28.9-20240416       | None                                                                            |
+--------------------------------------+-----------------------------------+---------------------------------------------------------------------------------+

Default Volume Types and Sizes

By default, Kubernetes cluster nodes are provisioned using the following volume types and disk sizes:

Volume

Type

Size

Root Volume

b1.sr-r3-nvme-1000

20GB

To change these values, you can provide additional labels to your template (see Customising clusters using labels).

For information on how volumes work, and the available storage types in a cluster, refer to the Storage documentation.

Deploying a Kubernetes cluster

This page shows how to create a cluster using the Catalyst Cloud CLI.

Note

If you would like to learn how to create a cluster using the Catalyst Cloud dashboard, please follow the Quick Start guide.

Creating a cluster

To create a new Kubernetes cluster, run the following command:

openstack coe cluster create dev-cluster1 \
--cluster-template kubernetes-v1.28.9-20240416 \
--master-count 3 \
--node-count 4

This command creates a cluster using the named template, and 3 control plane (master) nodes and 4 worker nodes. The name of the cluster will be dev-cluster1. These parameters can be adjusted according to your needs.

The control plane (master) node count must be a small, uneven (odd) number. This is to ensure the etcd distributed key-value store has an efficient and highly available quorum available (e.g. 4 has no benefit over 3, so is not permitted). The values 1, 3, 5 and 7 are permitted by the API.

The worker node count can be any positive number, or zero.

Note

If you are looking to scale to a large number of nodes, please get in touch via the Support Centre, as there are quota and performance changes to apply at cluster creation time for more than 50 nodes.

Kubernetes officially supports up to 5000 nodes.

Customising clusters using labels

It is possible to override the behaviour of a template by adding or modifying the labels supplied by the template.

To do this, we need to provide the --merge-labels parameter along with the --labels parameter followed by the desired label or labels to modify.

To specify a single label:

--merge-labels --labels key=value

You can define multiple labels by separating them into comma-separated key/value pairs. When specifying multiple labels, ensure that there is no whitespace in the list:

--merge-labels --labels key=value,key=value

If we want to enable the master_lb_floating_ip_enabled feature on our cluster, we would use a cluster creation command like this:

openstack coe cluster create dev-cluster1 \
--cluster-template kubernetes-v1.28.9-20240416 \
--merge-labels \
--labels master_lb_floating_ip_enabled=true \
--master-count 3 \
--node-count 3

Private vs Public Kubernetes API access

All provided cluster templates create a loadbalancer that is used to access the Kubernetes API. By default this loadbalancer does not have a floating IP, which limits access to only the subnet it is listening on.

This means the Kubernetes API must be accessed from a bastion host within the same network.

If you wish to create a publically accessible Kubernetes API (for kubectl or other tooling to use), you can do so by adding the following to the cluster creation command.

--labels master_lb_floating_ip_enabled=true --merge-labels

It is important to note the security implications of doing this, as your Kubernetes API will be exposed to the internet.

Note

The --merge-labels option is required, so that default labels in the Cluster Template are not removed.

Checking the status of the cluster

Cluster deployment status

A cluster will take, on average, 10 to 15 minutes be created.

You can use the following command to check the status of the cluster:

$ openstack coe cluster list
+--------------------------------------+--------------+---------+------------+--------------+-----------------+---------------+
| uuid                                 | name         | keypair | node_count | master_count | status          | health_status |
+--------------------------------------+--------------+---------+------------+--------------+-----------------+---------------+
| 1fa44912-54e6-4421-a633-e2a831c38f60 | dev-cluster1 | None    |          2 |            3 | CREATE_COMPLETE | HEALTHY       |
+--------------------------------------+--------------+---------+------------+--------------+-----------------+---------------+

Alternatively, you can check the status of the cluster on the Clusters panel, in the Container Infra section of the Dashboard.

Please wait until the status changes to CREATE_COMPLETE to proceed.

Cluster health status

The other field worth mentioning here is that of the health of the cluster. This can be viewed by drilling down into the details of the cluster in the dashboard by clicking on the link that is its name.

Alternatively, if you are working from the command line you can query the state of a given cluster with the following command.

$ openstack coe cluster show dev-cluster1 -c name -c status -c status_reason -c health_status -c health_status_reason
+----------------------+------------------------------------------------------------------------------------------------+
| Field                | Value                                                                                          |
+----------------------+------------------------------------------------------------------------------------------------+
| status               | CREATE_COMPLETE                                                                                |
| health_status        | HEALTHY                                                                                        |
| status_reason        | None                                                                                           |
| name                 | dev-cluster1                                                                                   |
| health_status_reason | {'cluster': 'Ready', 'infrastructure': 'Ready', 'controlplane': 'Ready', 'nodegroup': 'Ready'} |
+----------------------+------------------------------------------------------------------------------------------------+

Here, status and status_reason show if the cluster is processing a request.

The fields health_status and health_status_reason are frequently updated and will surface errors relating to the cluster such as quota or deletion failure reasons.

Accessing a private cluster

Once the cluster status is CREATE_COMPLETE and you have successfully retrieved the cluster admin kubeconfig, we need to confirm that we are able to access the cluster.

Note

The use of the bastion server is unnecessary if you created a cluster with a loadbalancer floating ip address.

If you did not override the default behaviour you will have created a private cluster. In order to access this, you will need to create a bastion host within the same network to allow you to reach the Kubernetes API.

Warning

When creating a bastion server on a private network that was created by Magnum, you will need to delete the bastion before the cluster delete can complete.

This is best done with a configuration management tool such as Terraform.

Failure to do this will result in a DELETE_IN_PROGRESS state that will not proceed further. More information on any deletion failure can be found in the field health_status_reason.

For the purpose of this example let’s assume we deployed a bastion host with the following characteristics:

  • Name - bastion1

  • Flavor - c1.c1r1

  • Image - ubuntu-22.04-x86_64

  • Network - attached to the Kubernetes cluster network, with floating IP.

  • Security Group - bastion-ssh-access

  • Security Group Rules - ingress TCP/22 from 114.110.xx.xx (public IP to allow traffic from)

The following commands check our setup and gather the information we need to set up our SSH forwarding in order to reach the API endpoint.

Find the instance external public IP address

$ openstack server show bastion1 -c addresses -f value
{'k8s-cluster-network1': ['10.0.0.16', '103.197.62.38']}

Confirm that we have a security group applied to our instance that allows inbound TCP connections on port 22 from our current public IP address. In this case our security group is called bastion-ssh-access and our public IP is 114.110.xx.xx.

$ openstack server show bastion1 -c security_groups -f value
[{'name': 'bastion-ssh-access'}, {'name': 'default'}]

$ openstack security group rule list bastion-ssh-access
+--------------------------------------+-------------+-----------+------------------+------------+-----------+-----------------------+----------------------+
| ID                                   | IP Protocol | Ethertype | IP Range         | Port Range | Direction | Remote Security Group | Remote Address Group |
+--------------------------------------+-------------+-----------+------------------+------------+-----------+-----------------------+----------------------+
| 42c1320c-98d5-4275-9c2d-xxxxxxxxxxxx | tcp         | IPv4      | 114.110.xx.xx/32 | 22:22      | ingress   | None                  | None                 |
+--------------------------------------+-------------+-----------+------------------+------------+-----------+-----------------------+----------------------+

Finally we need the IP address for the Kubernetes API endpoint

$ openstack coe cluster show dev-cluster1 -c api_address -f value
https://10.0.0.5:6443

Note

Setting up SSH forwarding is optional. You could also SSH to the bastion host, copy the kubeconfig file, install kubectl, and run your cluster interactions from there.

Install and configure software on the bastion host

# SSH to the bastion host floating IP address
$ ssh ubuntu@103.197.62.38

# Install tinyproxy
$ sudo apt update
$ sudo apt install tinyproxy

Configure tinyproxy to allow local connections and access to port 6443.

$ echo -e "Allow localhost\nConnectPort 6443" | sudo tee -a /etc/tinyproxy/tinyproxy.conf
$ sudo systemctl restart tinyproxy

Now you can start SSH port forwarding

# Start port forwarding to Tinyproxy on the bastion host.
$ ssh -L 8888:127.0.0.1:8888 ubuntu@103.197.62.38 -N -q -f

# Use the Tinyproxy port as an HTTPS proxy server for subsequent commands in this terminal.
$ export HTTPS_PROXY=127.0.0.1:8888

and use kubectl with the kubeconfig file.

$ export KUBECONFIG=$(pwd)/config
$ kubectl get nodes -o wide
NAME                                                    STATUS   ROLES           AGE    VERSION   INTERNAL-IP   EXTERNAL-IP     OS-IMAGE                                             KERNEL-VERSION   CONTAINER-RUNTIME
dev-cluster-ljgmh4m3xeo5-control-plane-d25b1658-gfj2w    Ready    control-plane   3d3h   v1.28.8   10.0.0.6      <none>        Flatcar Container Linux by Kinvolk 3815.2.0 (Oklo)   6.1.77-flatcar   containerd://1.7.13
dev-cluster-ljgmh4m3xeo5-control-plane-d25b1658-gt6vq    Ready    control-plane   3d3h   v1.28.8   10.0.0.5      <none>        Flatcar Container Linux by Kinvolk 3815.2.0 (Oklo)   6.1.77-flatcar   containerd://1.7.13
dev-cluster-ljgmh4m3xeo5-control-plane-d25b1658-qxsqz    Ready    control-plane   3d3h   v1.28.8   10.0.0.4      <none>        Flatcar Container Linux by Kinvolk 3815.2.0 (Oklo)   6.1.77-flatcar   containerd://1.7.13
dev-cluster-ljgmh4m3xeo5-default-worker-5578dbd4-6lf9r   Ready    <none>          3d3h   v1.28.8   10.0.0.23     <none>        Flatcar Container Linux by Kinvolk 3815.2.0 (Oklo)   6.1.77-flatcar   containerd://1.7.13
dev-cluster-ljgmh4m3xeo5-default-worker-5578dbd4-8bkpg   Ready    <none>          3d3h   v1.28.8   10.0.0.12     <none>        Flatcar Container Linux by Kinvolk 3815.2.0 (Oklo)   6.1.77-flatcar   containerd://1.7.13
dev-cluster-ljgmh4m3xeo5-default-worker-5578dbd4-qtkbt   Ready    <none>          3d3h   v1.28.8   10.0.0.29     <none>        Flatcar Container Linux by Kinvolk 3815.2.0 (Oklo)   6.1.77-flatcar   containerd://1.7.13

You can now proceed with deploying your applications into the cluster using kubectl or preferred deployment tool (such as helm).

Resizing a cluster

This section shows how to manually resize an existing cluster using the Catalyst Cloud API.

Note

Catalyst Cloud Kubernetes Service does not support auto-scaling of worker nodes in clusters running Kubernetes 1.28 and above at this time.

Growing or shrinking a cluster

Before we resize a cluster, we should review the current node count. This is visible in the Dashboard and CLI.

$ openstack coe cluster show dev-cluster1 -c node_count
+------------+-------+
| Field      | Value |
+------------+-------+
| node_count | 2     |
+------------+-------+

We can then set a new worker size on the cluster. This can handle scaling up or down.

# Resize the number of worker nodes to 4
$ openstack coe cluster resize dev-cluster1 4
Request to resize cluster dev-cluster1 has been accepted.

and we can see progress of the update, during which the cluster health will change to UNHEALTHY (because the desired number of nodes temporarily differs from actual)

# Showing the resize in progress
$ openstack coe cluster show dev-cluster1 -c name -c status -c status_reason -c health_status -c health_status_reason -c node_count
+----------------------+-------------------------------------------------------------------------------------------------------------------------------------------+
| Field                | Value                                                                                                                                     |
+----------------------+-------------------------------------------------------------------------------------------------------------------------------------------+
| status               | UPDATE_IN_PROGRESS                                                                                                                        |
| health_status        | UNHEALTHY                                                                                                                                 |
| status_reason        | None                                                                                                                                      |
| node_count           | 4                                                                                                                                         |
| name                 | dev-cluster1                                                                                                                              |
| health_status_reason | {'cluster': 'Ready', 'infrastructure': 'Ready', 'controlplane': 'Ready', 'nodegroup': "default-worker waiting on ['Ready', 'Available']"} |
+----------------------+-------------------------------------------------------------------------------------------------------------------------------------------+
# After a short amount of time
$ openstack coe cluster show dev-cluster1 -c name -c status -c status_reason -c health_status -c health_status_reason -c node_count
+----------------------+------------------------------------------------------------------------------------------------+
| Field                | Value                                                                                          |
+----------------------+------------------------------------------------------------------------------------------------+
| status               | UPDATE_COMPLETE                                                                                |
| health_status        | HEALTHY                                                                                        |
| status_reason        | None                                                                                           |
| node_count           | 4                                                                                              |
| name                 | dev-cluster1                                                                                   |
| health_status_reason | {'cluster': 'Ready', 'infrastructure': 'Ready', 'controlplane': 'Ready', 'nodegroup': 'Ready'} |
+----------------------+------------------------------------------------------------------------------------------------+

In Kubernetes we can now see the additional worker nodes and pods can schedule to them.

$ kubectl get nodes -o wide
NAME                                                      STATUS   ROLES           AGE    VERSION   INTERNAL-IP   EXTERNAL-IP   OS-IMAGE                                             KERNEL-VERSION   CONTAINER-RUNTIME
dev-cluster1-47ctpuwqwfsi-control-plane-a8617329-hwfvz    Ready    control-plane   113m   v1.28.8   10.0.0.5      <none>        Flatcar Container Linux by Kinvolk 3815.2.0 (Oklo)   6.1.77-flatcar   containerd://1.7.13
dev-cluster1-47ctpuwqwfsi-default-worker-10b73ddb-j5r2q   Ready    <none>          111m   v1.28.8   10.0.0.4      <none>        Flatcar Container Linux by Kinvolk 3815.2.0 (Oklo)   6.1.77-flatcar   containerd://1.7.13
dev-cluster1-47ctpuwqwfsi-default-worker-10b73ddb-k8wpw   Ready    <none>          111m   v1.28.8   10.0.0.12     <none>        Flatcar Container Linux by Kinvolk 3815.2.0 (Oklo)   6.1.77-flatcar   containerd://1.7.13
dev-cluster1-47ctpuwqwfsi-default-worker-10b73ddb-ljcf5   Ready    <none>          67m    v1.28.8   10.0.0.19     <none>        Flatcar Container Linux by Kinvolk 3815.2.0 (Oklo)   6.1.77-flatcar   containerd://1.7.13
dev-cluster1-47ctpuwqwfsi-default-worker-10b73ddb-mbtwp   Ready    <none>          67m    v1.28.8   10.0.0.22     <none>        Flatcar Container Linux by Kinvolk 3815.2.0 (Oklo)   6.1.77-flatcar   containerd://1.7.13

Node Groups

Node groups are a means to create collections of resources that provide a way to enforce scheduling requirements within a cluster.

When a cluster is created it already has two node groups, default-master and default-worker. The number and type of nodes that you specify at creation time become the defaults for each of these pools.

Resize commands that do not specify a node group are performed on the default-worker nodegroup.

Using the openstack coe nodegroup commands we can add, modify or delete custom node groups within our cluster.

These groups allow for customised configurations, such as node flavor that are applied to all nodes within the node group.

Note

All nodes in a given node group are identical to one another, so any changes to the node group configuration is applied to all nodes in the node group.

Working with node groups

First lets list the default node groups in our cluster named dev-cluster1.

$ openstack coe nodegroup list dev-cluster1
+--------------------------------------+----------------+-----------+---------------------------+------------+-----------------+--------+
| uuid                                 | name           | flavor_id | image_id                  | node_count | status          | role   |
+--------------------------------------+----------------+-----------+---------------------------+------------+-----------------+--------+
| 1d6a8545-135c-478e-a215-4712d4fbfe86 | default-master | c1.c2r4   | flatcar-kube-1.28.8-41650 |          1 | CREATE_COMPLETE | master |
| b7ed8c6e-0f20-462f-8d0a-f55276ee3194 | default-worker | c1.c2r4   | flatcar-kube-1.28.8-41650 |          4 | UPDATE_COMPLETE | worker |
+--------------------------------------+----------------+-----------+---------------------------+------------+-----------------+--------+

Creating a node group

Now let’s add a new nodegroup to our cluster with the following specifications

  • Node count of 2 (if this is not provided it will default to 1)

  • A node role called test (if this is not provided it will default to worker)

  • A nova flavor of c1.c4r4.

  • Node group name of larger-pool.

$ openstack coe nodegroup create dev-cluster1 larger-pool --node-count 2 --role test --flavor c1.c4r4
Request to create nodegroup 3dd6b845-e1f9-449a-a26e-f761ec5e56f3 accepted

We can check our new node group with the following command.

$ openstack coe nodegroup list dev-cluster1
+--------------------------------------+----------------+-----------+---------------------------+------------+--------------------+--------+
| uuid                                 | name           | flavor_id | image_id                  | node_count | status             | role   |
+--------------------------------------+----------------+-----------+---------------------------+------------+--------------------+--------+
| 1d6a8545-135c-478e-a215-4712d4fbfe86 | default-master | c1.c2r4   | flatcar-kube-1.28.8-41650 |          1 | CREATE_COMPLETE    | master |
| b7ed8c6e-0f20-462f-8d0a-f55276ee3194 | default-worker | c1.c2r4   | flatcar-kube-1.28.8-41650 |          4 | UPDATE_COMPLETE    | worker |
| 3dd6b845-e1f9-449a-a26e-f761ec5e56f3 | larger-pool    | c1.c4r4   | flatcar-kube-1.28.8-41650 |          2 | CREATE_IN_PROGRESS | test   |
+--------------------------------------+----------------+-----------+---------------------------+------------+--------------------+--------+

Roles can be used to show the purpose of a node group, and multiple node groups can be given the same role if they share a common purpose.

$ kubectl get nodes -L magnum.openstack.org/role -L capi.catalystcloud.nz/node-group
NAME                                                      STATUS   ROLES           AGE    VERSION   ROLE   NODE-GROUP
dev-cluster1-47ctpuwqwfsi-control-plane-a8617329-hwfvz    Ready    control-plane   132m   v1.28.8
dev-cluster1-47ctpuwqwfsi-default-worker-10b73ddb-j5r2q   Ready    <none>          130m   v1.28.8          default-worker
dev-cluster1-47ctpuwqwfsi-default-worker-10b73ddb-k8wpw   Ready    <none>          130m   v1.28.8          default-worker
dev-cluster1-47ctpuwqwfsi-default-worker-10b73ddb-ljcf5   Ready    <none>          85m    v1.28.8          default-worker
dev-cluster1-47ctpuwqwfsi-default-worker-10b73ddb-mbtwp   Ready    <none>          86m    v1.28.8          default-worker
dev-cluster1-47ctpuwqwfsi-larger-pool-ea1e4431-mskgl      Ready    <none>          8m2s   v1.28.8          larger-pool
dev-cluster1-47ctpuwqwfsi-larger-pool-ea1e4431-x6jgs      Ready    <none>          8m     v1.28.8          larger-pool

Warning

Currently(2024-04-15) in Kubernetes 1.28 the ROLE label is not being set on Kubernetes nodes.

This is a bug and will be addressed soon.

The roles are also set on Kubernetes nodes, and can be used for scheduling with the use of a node selector.

nodeSelector:
  magnum.openstack.org/role: test

or using the node-group name label:

nodeSelector:
  capi.catalystcloud.nz/node-group: larger-pool

Resizing a node group

Node groups are resized with the same commands as resizing a cluster (which resizes the node group default-worker), but we provide the --nodegroup parameter to target a different node group.

$ openstack coe cluster resize dev-cluster1 --nodegroup larger-pool 1
Request to resize cluster dev-cluster1 has been accepted.

and we can see the node group is resized:

$ openstack coe nodegroup list dev-cluster1
+--------------------------------------+----------------+-----------+---------------------------+------------+-----------------+--------+
| uuid                                 | name           | flavor_id | image_id                  | node_count | status          | role   |
+--------------------------------------+----------------+-----------+---------------------------+------------+-----------------+--------+
| 1d6a8545-135c-478e-a215-4712d4fbfe86 | default-master | c1.c2r4   | flatcar-kube-1.28.8-41650 |          1 | CREATE_COMPLETE | master |
| b7ed8c6e-0f20-462f-8d0a-f55276ee3194 | default-worker | c1.c2r4   | flatcar-kube-1.28.8-41650 |          4 | UPDATE_COMPLETE | worker |
| 3dd6b845-e1f9-449a-a26e-f761ec5e56f3 | larger-pool    | c1.c4r4   | flatcar-kube-1.28.8-41650 |          1 | UPDATE_COMPLETE | test   |
+--------------------------------------+----------------+-----------+---------------------------+------------+-----------------+--------+

Resizing the master node group

In Kubernetes 1.28 and above, the default-master node group can be resized. Before this it is not possible.

This means you can change a cluster between being a single control plane (thus, not highly available) to having 3 or 5 control plane nodes and being highly available.

The operation is the same as resizing a worker node group:

# Make our cluster highly available, with 3 control plane nodes.
$ openstack coe cluster resize dev-cluster1 --nodegroup default-master 3
Request to resize cluster dev-cluster1 has been accepted.

Deleting a node group

Any node group except the default-master and default-worker node groups can be deleted, by specifying the cluster and nodegroup name or ID.

$ openstack coe nodegroup delete dev-cluster1 larger-pool
Request to delete nodegroup larger-pool has been accepted.

Note that though the default-worker node group cannot be deleted, it can be resized to 0.