Load Balancers

Web or service applications running in a cluster environment such as Kubernetes require some means by which they can be accessed from the outside world. Kubernetes supports a couple of ways of providing this in the form of NodePort and LoadBalancer type services.

Because all of the nodes in a managed Kubernetes cluster are on a private network, a NodePort service would only be useful in combination with a separate load balancer. The LoadBalancer service, on the other hand, provides everything necessary to route public web traffic to an application.

Creating a Load Balancer

Catalyst Cloud Kubernetes Service integrates the LoadBalancer service type directly with Catalyst Cloud’s Load Balancer as a Service (LBaaS) service.

../_images/load-balancer-provision.drawio.svg

Provisioning a load balancer for your application is extremely easy. As shown in the figure above, a developer first creates a LoadBalancer service that points to an application Pod. The control plane will then provision a Catalyst Cloud Load Balancer which will then route requests to the Pod.

We can demonstrate how easy it is to route traffic to your web application using a practical example.

First, let’s create a simple web application. Create a file called nginx-app.yml, containing the following YAML (which is a deployment of an Nginx server).

---
apiVersion: apps/v1
kind: Deployment
metadata:
  name: nginx-test-app
  labels:
    app: nginx-app
spec:
  replicas: 1
  selector:
    matchLabels:
      app: nginx-app
  template:
    metadata:
      labels:
        app: nginx-app
    spec:
      containers:
      - name: nginx
        image: nginx:latest
        ports:
        - containerPort: 80

Run kubectl apply to create the deployment.

$ kubectl apply -f nginx-app.yml
deployment.apps/nginx-test-app created

At the moment we have a pod running in our cluster that is not visible to the outside world.

$ kubectl get pods
NAME                              READY   STATUS    RESTARTS   AGE
nginx-test-app-65b8cd96c4-kqtlm   1/1     Running   0          11m

Now let’s create an external load balancer and expose our application on a public IP address. There are two ways of doing this:

  • Imperative (running an ad-hoc command to create the load balancer)

  • Declarative (defining a load balancer as a resource definition in code, and then applying the resource to Kubernetes)

Run the following command to expose the nginx-test-app deployment through a load balancer.

$ kubectl expose deployment nginx-test-app --name nginx-lb --port=80 --type=LoadBalancer
service/nginx-lb exposed

Note

It is not possible to create load balancers for a Kubernetes cluster via the Catalyst Cloud dashboard or using the API openstack loadbalancer create command.

For a Kubernetes cluster, a load balancer must always be created using the Kubernetes API.

Watch the services to see when the load balancer is provisioned with a public facing IP address. This may take a few minutes.

$ kubectl get svc -w
NAME         TYPE           CLUSTER-IP      EXTERNAL-IP   PORT(S)        AGE
kubernetes   ClusterIP      172.24.0.1      <none>        443/TCP        7m28s
nginx-lb     LoadBalancer   172.30.104.86   <pending>     80:30990/TCP   12s
nginx-lb     LoadBalancer   172.30.104.86   <pending>     80:30990/TCP   2m43s
nginx-lb     LoadBalancer   172.30.104.86   192.0.2.1     80:30990/TCP   2m43s

After a few minutes, a new address should appear under EXTERNAL-IP. Once the IP address appears, you should be able to hit the Nginx webserver on that IP:

$ curl http://192.0.2.1
<!DOCTYPE html>
<html>
<head>
<title>Welcome to nginx!</title>
<style>
html { color-scheme: light dark; }
body { width: 35em; margin: 0 auto;
font-family: Tahoma, Verdana, Arial, sans-serif; }
</style>
</head>
<body>
<h1>Welcome to nginx!</h1>
<p>If you see this page, the nginx web server is successfully installed and
working. Further configuration is required.</p>

<p>For online documentation and support please refer to
<a href="http://nginx.org/">nginx.org</a>.<br/>
Commercial support is available at
<a href="http://nginx.com/">nginx.com</a>.</p>

<p><em>Thank you for using nginx.</em></p>
</body>
</html>

That’s it! You’ve created a simple web application and set up a load balancer to route public traffic to it. Of course this is just a trivial example, but it highlights how easy it is to create a public facing service on the web.

The following sections cover the different settings for the LoadBalancers service.

For more information on alternative ways to set up external access to your Kubernetes applications, please refer to the Ingress guide.

Kubernetes Load Balancers in Catalyst Cloud

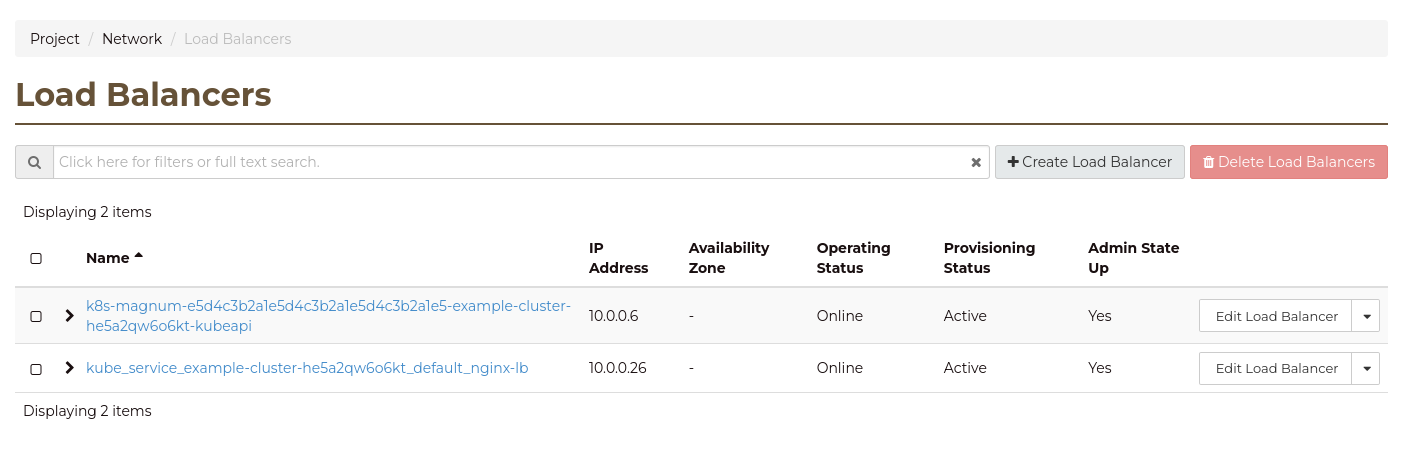
If we look in the Catalyst Cloud dashboard, we can see that a number of load balancers have been provisioned by Kubernetes.

These load balancers will have a name starting with either k8s-magnum, k8s-clusterapi, or kube_service, and suffixed with IDs to uniquely identify them internally.

They can be inspected using the Catalyst Cloud dashboard or API.

Note

To be able to view load balancers, your user must have the Project Member role.

Run the openstack loadbalancer list command to list all existing load balancers.

$ openstack loadbalancer list
+--------------------------------------+----------------------------------------------------------------------------------+----------------------------------+-------------+---------------------+------------------+----------+
| id                                   | name                                                                             | project_id                       | vip_address | provisioning_status | operating_status | provider |
+--------------------------------------+----------------------------------------------------------------------------------+----------------------------------+-------------+---------------------+------------------+----------+
| 4530674c-4a97-4d36-ba1a-166acd8f8b3c | k8s-magnum-e5d4c3b2a1e5d4c3b2a1e5d4c3b2a1e5-example-cluster-he5a2qw6o6kt-kubeapi | e5d4c3b2a1e5d4c3b2a1e5d4c3b2a1e5 | 10.0.0.6    | ACTIVE              | ONLINE           | amphora  |
| 5eddf845-3819-484b-b5d6-1319d6d593f6 | kube_service_example-cluster-he5a2qw6o6kt_default_nginx-lb                       | e5d4c3b2a1e5d4c3b2a1e5d4c3b2a1e5 | 10.0.0.26   | ACTIVE              | ONLINE           | amphora  |
+--------------------------------------+----------------------------------------------------------------------------------+----------------------------------+-------------+---------------------+------------------+----------+

The load balancers serve the following purposes:

  • Load balancers starting with kube_service are Kubernetes LoadBalancer resources for allowing external access to connected applications.

  • Load balancers starting with k8s-magnum or k8s-clusterapi are management load balancers for interfacing with the Kubernetes API, and are used by Catalyst Cloud Kubernetes Service to configure the cluster.

Warning

Do not modify the load balancers created by Kubernetes directly using the Catalyst Cloud dashboard or API. Doing so may cause your cluster to become inaccessible.

In the rare case that it may be necessary to delete a load balancer, please raise a ticket via the Support Centre.

Annotations

While the default behaviour of the LoadBalancer service may be fine for the majority of use cases, there are times when this behaviour will need to be changed to suit particular use cases.

Some examples of where this might be applicable include:

  • Being able to retain the floating IP used for the VIP.

  • Creating a load balancer that does not have an IP address assigned from the public address pool.

  • The ability to assign which network, subnet or port the load balancer will use for its VIP address.

Fortunately Kubernetes supplies a means to achieve these desired changes in behaviour through the use of annotations.

Using an internal IP address

By default, load balancers are created with an publically addressable public IP address (a floating IP).

With the following annotation, it is possible to configure the load balancer so that it uses an internal IP address as its virtual IP (VIP).

metadata:
  annotations:
    service.beta.kubernetes.io/openstack-internal-load-balancer: "true"

A simple example would look like this.

---
apiVersion: v1
kind: Service
metadata:
  name: lb-internal-ip
  namespace: default
  annotations:
    service.beta.kubernetes.io/openstack-internal-load-balancer: "true"
spec:
  type: LoadBalancer
  selector:
    app: nginx-app
  ports:
    - protocol: TCP
      port: 80
      targetPort: 80

Save the above file as nginx-lb-internal.yml, and run the following command to create the load balancer.

kubectl apply -f nginx-lb-internal.yml

The resulting load balancer would be provisioned with a external IP address from the Kubernetes cluster internal network.

If we examine the cluster nodes, we can see that the internal network address are in the 10.0.0.0/24 subnet, and a querying the new service shows that it too has been assigned an address from this same range as its VIP.

$ kubectl describe nodes | grep InternalIP
InternalIP:  10.0.0.35
InternalIP:  10.0.0.11
$ kubectl get svc lb-internal-ip
NAME             TYPE           CLUSTER-IP      EXTERNAL-IP   PORT(S)        AGE
lb-internal-ip   LoadBalancer   172.26.62.148   10.0.0.5      80:32298/TCP   46m

Using a pre-existing IP address

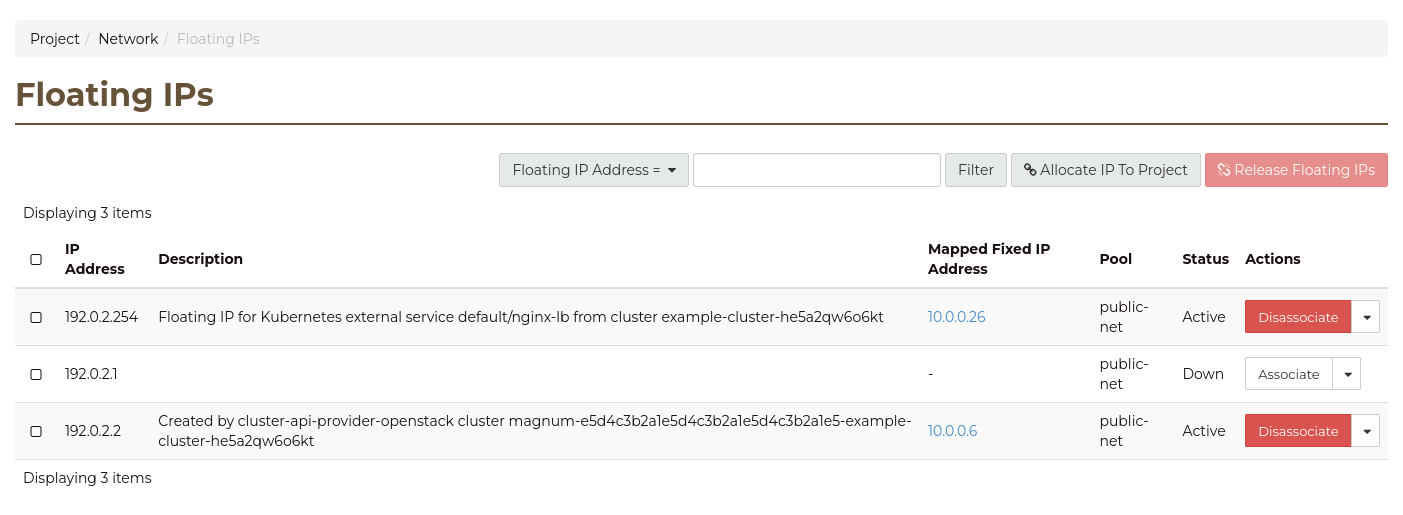
When creating a new load balancer, by default a new floating IP is allocated to your project and associated with the load balancer.

However, there may be cases where it is desirable to use a floating IP that has already been allocated to your project, instead of allocating a new one (e.g. to maintain DNS record stability).

This can be done by specifying loadBalancerIP in our service manifest (replace 192.0.2.1 with the floating IP you wish to use).

spec:
  type: LoadBalancer
  loadBalancerIP: 192.0.2.1

Kubernetes will take control of the floating IP when the load balancer is created. Normally this means the floating IP will be released back into the public address pool when the load balancer is deleted.

However, we can also define the following annotation to ensure the floating IP is retained in the project, even when the load balancer is deleted:

metadata:
  annotations:
    loadbalancer.openstack.org/keep-floatingip: "true"

Here is an example service that creates a load balancer for an Nginx application.

---
apiVersion: v1
kind: Service
metadata:
  name: nginx-lb-retain-fip
  namespace: default
  annotations:
    loadbalancer.openstack.org/keep-floatingip: "true"
spec:
  type: LoadBalancer
  loadBalancerIP: 192.0.2.1
  selector:
    app: nginx-app
  ports:
    - protocol: TCP
      port: 80
      targetPort: 80

Save the manifest as nginx-lb-retain-fip.yml (replacing 192.0.2.1 with the floating IP you wish to use), and run kubectl apply to create the service.

$ kubectl apply -f nginx-lb-retain-fip.yml
service/nginx-lb-retain-fip created

The service should now be created, and after a couple of minutes, the floating IP will be associated with the load balancer.

$ kubectl get svc nginx-lb-retain-fip
NAME                  TYPE           CLUSTER-IP      EXTERNAL-IP   PORT(S)        AGE
nginx-lb-retain-fip   LoadBalancer   172.25.79.189   192.0.2.1     80:32279/TCP   4m16s

To test whether or not the floating IP is retained, you can delete the newly created service.

$ kubectl delete -f nginx-lb-retain-fip.yml
service "nginx-lb-retain-fip" deleted

Even though the load balancer has been deleted, the 192.0.2.1 address should remain allocated to your project, instead of being released.

This can be checked using the Catalyst Cloud API or dashboard.

Run the openstack floating ip list command to list all floating IP allocations in your project.

$ openstack floating ip list
+--------------------------------------+---------------------+------------------+--------------------------------------+--------------------------------------+----------------------------------+
| ID                                   | Floating IP Address | Fixed IP Address | Port                                 | Floating Network                     | Project                          |
+--------------------------------------+---------------------+------------------+--------------------------------------+--------------------------------------+----------------------------------+
| 2cafd74b-190a-48f8-8dfe-5922944e608a | 192.0.2.255         | 10.0.0.26        | d128acb1-90ef-4f1a-a12f-35e51a837ee5 | 993e826c-74c2-4b44-ad6f-5b2e717504ca | e5d4c3b2a1e5d4c3b2a1e5d4c3b2a1e5 |
| e2b4a8e8-bd84-4946-89dd-aa20c749114f | 192.0.2.1           | None             | None                                 | 993e826c-74c2-4b44-ad6f-5b2e717504ca | e5d4c3b2a1e5d4c3b2a1e5d4c3b2a1e5 |
| e81e87e1-7d15-4141-9ea4-32aad7254faf | 192.0.2.2           | 10.0.0.6         | 38085b6c-f88d-4872-ac66-d9077c724a51 | 993e826c-74c2-4b44-ad6f-5b2e717504ca | e5d4c3b2a1e5d4c3b2a1e5d4c3b2a1e5 |
+--------------------------------------+---------------------+------------------+--------------------------------------+--------------------------------------+----------------------------------+

Getting the source IP address for web requests

There are cases where an application needs to be able to determine the original IP address for requests it receives.

In order to do this we need to enable X-Forwarded-For support. X-Forwarded-For is an HTTP header that can be appended to HTTP requests by load balancers/reverse proxies that are put in front of applications, and can be used to identify the originating IP address of the connecing client.

If we deploy a standard LoadBalancer service in front of an application using the default settings, we can confirm that the original IP address of the client is not visible.

Here is a deployment manifest for an echoserver that can will return the found client IP address for each request.

---
apiVersion: apps/v1
kind: Deployment
metadata:
  name: echoserver
spec:
  selector:
    matchLabels:
      app: echoserver
  replicas: 1
  template:
    metadata:
      labels:
        app: echoserver
    spec:
      containers:
      - image: registry.k8s.io/e2e-test-images/echoserver:2.5
        name: echoserver
        ports:
        - containerPort: 8080

Save the manifest as echoserver-deployment.yml, and create the deployment:

kubectl apply -f echoserver-deployment.yml

Here is the manifest for the accompanying load balancer, to expose the application to the Internet.

---
apiVersion: v1
kind: Service
metadata:
  name: echoserver-lb
spec:
  selector:
    app: echoserver
  type: LoadBalancer
  ports:
  - name: http
    port: 80
    targetPort: 8080
    protocol: TCP

Save this manifest as echoserver-lb.yml, and run the command to create it:

kubectl apply -f echoserver-lb.yml

Run the following command to fetch the public IP address of the echoserver load balancer.

$ kubectl get svc echoserver-lb
NAME            TYPE           CLUSTER-IP       EXTERNAL-IP   PORT(S)        AGE
echoserver-lb   LoadBalancer   172.25.133.150   192.0.2.1     80:32617/TCP   2m28s

We can see by querying with curl that there is no source information available in the Request Headers section.

$ curl http://192.0.2.1


Hostname: echoserver-58b4d6d69f-xvf6l

Pod Information:
  -no pod information available-

Server values:
  server_version=nginx: 1.14.2 - lua: 10015

Request Information:
  client_address=10.0.0.11
  method=GET
  real path=/
  query=
  request_version=1.1
  request_scheme=http
  request_uri=http://192.0.2.1:8080/

Request Headers:
  accept=*/*
  host=192.0.2.1
  user-agent=curl/7.68.0

Request Body:
  -no body in request-

If we now add the loadbalancer.openstack.org/x-forwarded-for annotation to our load balancer manifest, like so:

---
apiVersion: v1
kind: Service
metadata:
  name: echoserver-lb
  annotations:
    loadbalancer.openstack.org/x-forwarded-for: "true"
spec:
  selector:
    app: echoserver
  type: LoadBalancer
  ports:
  - name: http
    port: 80
    targetPort: 8080
    protocol: TCP

And then deploy our changes by saving the above manifest to echoserver-lb-2.yml, then applying it:

kubectl apply -f echoserver-lb-2.yml

Re-running our curl query, your local network’s public IP address should now be listed in the the Request Headers section under the x-forwarded-for header.

$ curl http://192.0.2.1


Hostname: echoserver-58b4d6d69f-xvf6l

Pod Information:
  -no pod information available-

Server values:
  server_version=nginx: 1.14.2 - lua: 10015

Request Information:
  client_address=10.0.0.11
  method=GET
  real path=/
  query=
  request_version=1.1
  request_scheme=http
  request_uri=http://192.0.2.1:8080/

Request Headers:
  accept=*/*
  host=192.0.2.1
  user-agent=curl/7.68.0
  x-forwarded-for=198.51.100.1

Request Body:
  -no body in request-

Annotation Reference

Here is a list of load balancer annotations supported by Catalyst Cloud Kubernetes Service.

Annotation

Type

Default Value

Description

loadbalancer.openstack.org/network-id

String

(variable)

The ID of the network to allocate a VIP for the load balancer in.

loadbalancer.openstack.org/subnet-id

String

(variable)

The ID of the subnet to allocate a VIP for the load balancer in.

loadbalancer.openstack.org/port-id

String

null

An existing port ID to attach the load balancer to.

If not specified, a new port will be automatically created.

loadbalancer.openstack.org/connection-limit

Integer

-1

The maximum number of connections per second allowed for the listener.

Set to -1 for unlimited.

loadbalancer.openstack.org/keep-floatingip

Boolean

false

Set to true to retain the floating IP in the project upon deletion.

For more information, see Using a pre-existing IP address.

loadbalancer.openstack.org/proxy-protocol

Boolean

false

Set to true to configure the load balancer as a PROXY load balancer.

Used to forward traffic to clients using the PROXY protocol (for example, when setting up Ingress using the PROXY protocol).

loadbalancer.openstack.org/x-forwarded-for

Boolean

false

Set to true to enable the X-Forwarded-For header in forwarded requests.

For more information, see Getting the source IP address for web requests.

service.beta.kubernetes.io/openstack-internal-load-balancer

Boolean

false

Set to true to allocate the load balancer an internal network VIP, instead of a publically accessible floating IP.

For more information, see Using an internal IP address.